Weed Cloning Kit: A Manual

Essential Guide to Using a Weed Cloning Kit
What Is a Weed Cloning Kit and Why Use It?
A weed cloning kit is an essential tool for any grower who wants to ensure consistent, reliable results from each plant. Instead of starting from seeds, which often vary in genetics and growth rates, a weed cloning kit lets you replicate your favorite plants with precision. This way, you know what to expect from your harvest each time. Cannabis cloning ensures every plant grown has the same characteristics, from potency to yield potential, saving you time and eliminating the unpredictability of growing from feminized marijuana seeds.
When dedicated to cultivating high-quality cannabis, a cloning kit is an investment that brings valuable returns. Starting with a cloning kit also eliminates the waiting game associated with seeds, as clones grow faster once roots are established. The efficiency, control, and convenience make this kit invaluable for growers looking to achieve uniform plants with every batch.
Recommended Strains

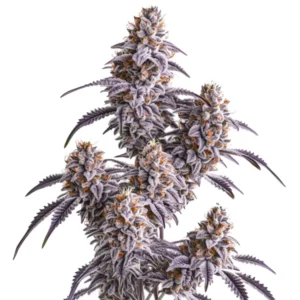
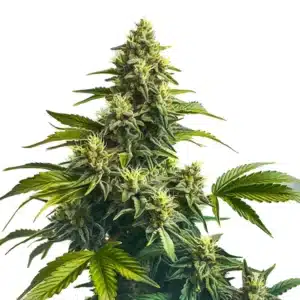
Permanent Marker
|
|
THC | 32% - 34% (High) |
|
|
Type | Feminized |
|
|
Yield | High |
|
|
Phenotype | 50% Indica / 50% Sativa |

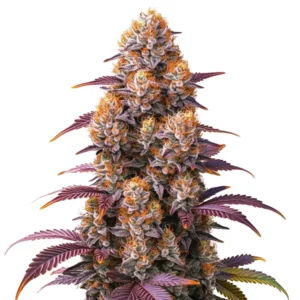
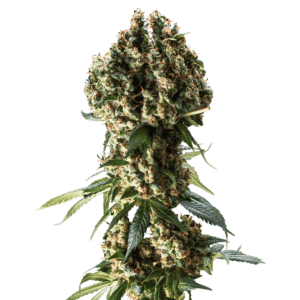
Permanent Marker Auto
|
|
THC | 32% - 34% (High) |
|
|
Type | Autoflowering |
|
|
Yield | High |
|
|
Phenotype | 50% Indica / 50% Sativa |
Key Components of a Weed Cloning Kit
A reliable cloning kit will typically contain several key components designed to support the delicate cloning process:
- Rooting Medium: The base where clones develop roots. Common choices include Rockwool, peat, and coco coir plugs, each offering moisture retention while promoting root aeration.
- Humidity Dome: Clones need a humid environment in their early stages. A clear plastic humidity dome keeps moisture in, creating the high humidity clones need for root development.
- Heating Mat: A heating mat under your cloning kit can improve root growth by keeping the medium warm. Most cannabis clones thrive when the root zone is around 70-75°F (21-24°C).
- Rooting Hormone: This gel or powder is applied to cuttings to stimulate root growth. While optional, it can significantly improve rooting success rates and reduce cloning time.
- Sterile Razor or Scissors: Clean, sharp tools prevent damage and infections. They allow for clean cuts that reduce plant stress, helping clones root faster.
Benefits of Cloning Kits for Cannabis Growers
Using a weed cloning kit benefits growers by ensuring each plant shares the same genetics as the mother plant, providing consistent effects, aromas, and yields. If you have a strain with ideal traits, like potency, resilience, or high yield, a cloning kit allows you to replicate those plants precisely.
Another benefit is time efficiency. Seed-grown plants need weeks to establish themselves, but clones from a kit reach the vegetative stage faster. They have a head start in growth, meaning you can harvest sooner, get higher yields, and potentially grow more cycles in a year.
Promos & Deals
Choosing the Right Weed Cloning Kit for Your Needs
Types of Cloning Kits: Basic to Advanced
Choosing the right weed cloning kit means selecting one that fits your experience level and growing setup. For beginners, simple kits with a humidity dome and Rockwool cubes are easy to use, providing all the basics without complexity. These kits help new growers establish roots quickly while learning the basics of cloning.
Advanced kits often include automated features like built-in heating mats, LED lights, and automated misting systems. These kits offer precision control over the clone’s environment, which is ideal for growers looking to maximize their cloning success rates. They’re perfect if you aim for large-scale growing or want to create consistently high-quality cannabis from elite strains.
Factors to Consider When Selecting a Cloning Kit
Several factors impact the effectiveness of a weed cloning kit, starting with its size. If you only need a few clones, a small kit will suffice. However, if you plan on cloning for a large grow, go for a kit that can hold multiple cuttings at once. Additionally, the quality of materials is important. Look for durable, easy-to-clean components.
Another key factor is the medium compatibility, ensure the kit includes or is compatible with Rockwool, peat pellets, or coco coir plugs that support healthy root development. Finally, consider whether the kit has a heating element, as maintaining the correct temperature can be the difference between clones that thrive and those that struggle.
Recommended Weed Cloning Kits for Beginners and Experts
For beginners, kits like the Blimburn Seeds Starter Clone Kit are highly recommended, providing all necessary components without complicated features. These kits help new growers master the basics of cloning without overwhelming them.
Experienced growers, on the other hand, might prefer an advanced weed cloning kit with added features. Kits with misting systems, temperature control, and light integration allow experts to achieve a high success rate with minimal oversight. Brands with a focus on professional growers offer these features, helping you cultivate top-quality clones with every batch.
Step-by-Step Guide to Using a Weed Cloning Kit
Preparing the Kit for Use
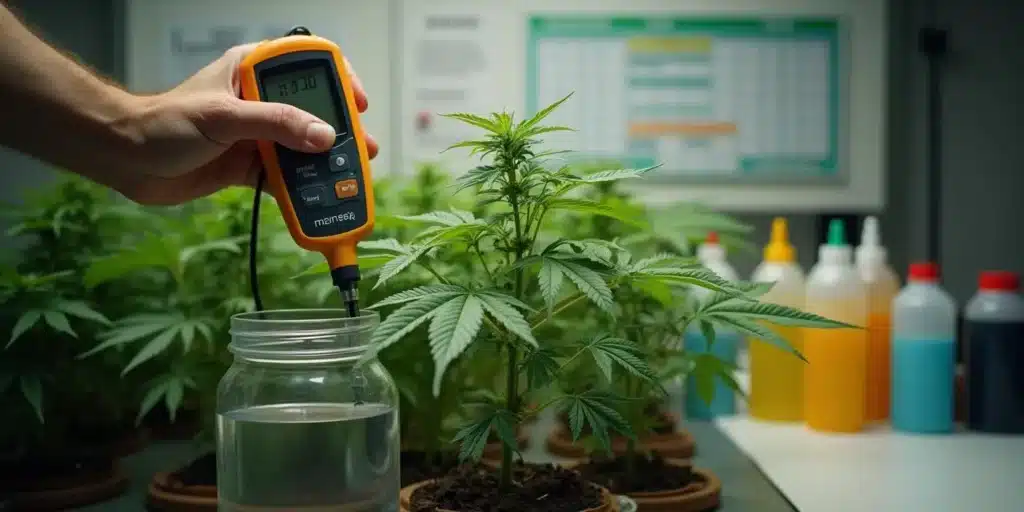
Preparation is key when using a weed cloning kit. Begin by cleaning all tools and components to avoid contamination, as clones are sensitive to bacteria and fungi. Next, soak the rooting medium in pH-balanced water, ideally between 5.8 and 6.3, which provides an ideal environment for root growth.
Once the rooting medium is ready, place it in the designated slots in the cloning kit. Set up your heating mat underneath if it’s part of your kit, and plug it in to ensure a warm, welcoming environment for the cuttings. Place the humidity dome on top to trap moisture and create an ideal humidity level.
Taking Cuttings for Cloning
For effective cloning, always take cuttings from a healthy mother plant. Choose a branch with at least two nodes and cut at a 45° angle using sterilized scissors. This angle exposes more of the stem, increasing the surface area for rooting. Strip off the leaves from the bottom node, leaving only a few leaves at the top to focus energy on root growth rather than foliage.
Dip the cut end into rooting hormone, ensuring it’s thoroughly coated. This step encourages faster, healthier root development and increases the chances of a successful clone. Once dipped, place the cutting immediately into the prepped medium in your weed cloning kit.
Placing Cuttings in the Kit and Ensuring Proper Conditions
After placing each cutting into the medium, ensure it’s standing upright and securely held. Position your cuttings under low-intensity light, as direct light can stress them. A fluorescent or LED light set at a safe distance works well, providing enough light to encourage growth without causing dehydration.
Place the humidity dome on the kit to maintain high humidity levels, around 80-90% is ideal. Check the temperature, adjusting the heating mat if needed to maintain a steady range between 70-75°F (21-24°C). These conditions help clones stay hydrated and stimulate root formation.

Monitoring and Maintaining Your Clones in the Kit
Clones require close monitoring for the first week. Mist the inside of the humidity dome daily to ensure a humid environment, and avoid opening it too often, as this disrupts humidity levels. Observe the clones for any signs of wilting or discoloration, which could indicate a need for more or less moisture.
Every two to three days, check the medium’s moisture levels. If it feels dry to the touch, add a small amount of water to keep it evenly moist. Avoid overwatering, as too much water can hinder root growth by cutting off oxygen supply.
Optimizing Cloning Kit Performance
Adjusting Humidity and Temperature for Optimal Growth
Humidity and temperature control are essential when using a weed cloning kit, especially in the first two weeks of rooting. Clones thrive in high humidity environments, ideally around 80-90% during the early stages. This high humidity helps prevent moisture loss, as clones cannot fully hydrate themselves through roots yet. If your kit includes a humidity dome, make sure it stays in place and mist the inside every day to maintain the right levels.
As clones develop stronger roots, you can gradually lower the humidity. By week three or four, aim for 70-75% humidity. Temperature also plays a vital role; keep it between 70-75°F (21-24°C) to promote root growth. For the best results, use a heating mat under your cloning kit to maintain consistent warmth in the root zone.
Using Nutrients and Rooting Hormones with Cloning Kits
A quality weed cloning kit provides the right conditions for roots, but to maximize success, nutrients and rooting hormones are crucial. Rooting hormones, available in gel or powder form, contain auxins that stimulate root development. When applying rooting hormone to the cuttings, make sure to coat the cut end evenly before placing it in the rooting medium. This speeds up the rooting process and enhances the clone’s health.
During the first few weeks, avoid using strong nutrients, as young clones are sensitive. Instead, use a gentle, diluted nutrient solution (about one-quarter strength) specifically designed for early growth stages. Once the roots start to develop, you can gradually increase the nutrient levels to support vegetative growth. Remember to check pH levels to keep the environment balanced, ideally between 5.8-6.3 in soilless mediums and 6.0-6.5 in soil.
Lighting Requirements for Weed Clones in Kits
The right lighting is essential for clones, but they need lower intensity light than mature plants. Start with a fluorescent or low-wattage LED light placed about 12-18 inches from the top of the clones. Strong, direct light can dehydrate clones, so keeping it low and indirect helps prevent stress. LED lights are particularly good for cloning because they produce less heat, reducing the risk of drying out your plants.
For the first week, clones typically thrive with a light cycle of 18 hours on and 6 hours off. This extended period of light encourages the clone to root without forcing it into full vegetative growth too soon. As the roots become established, you can increase light intensity or move the lights slightly closer, promoting faster leaf and stem development.
Cloning Mistakes and How to Avoid Them
Cloning cannabis requires precision, and certain missteps can significantly impact success rates. One common mistake is overwatering. Clones need a moist, not soaking wet, environment, as too much water can suffocate the roots and cause rot. Always check the medium and water sparingly to keep it slightly damp.
Another mistake is placing clones under high-intensity lights or direct sunlight, which can cause dehydration. As mentioned, opt for gentle lighting and avoid direct sunlight in the early stages. Using unclean tools or environments is another pitfall; sterilize scissors, domes, and any equipment that touches the clones to prevent bacteria or fungus from taking hold. Lastly, avoid overcrowding clones in the kit, as too many cuttings packed closely together can reduce airflow and increase humidity, inviting mold and mildew.
Post-Cloning Care and Transplanting
Recognizing When Your Clones Are Ready for Transplant
Knowing when to transplant clones is crucial for a successful transition. Typically, clones are ready for transplanting when they have developed strong, white roots that are visible around the base of the rooting medium. This usually happens around week three or four, depending on conditions and the strain. Avoid rushing this process, as clones need a solid root system to handle the stress of transplantation.
Signs that your clones are ready for transplant include firm, green stems and visible root structures. You’ll also notice new growth in the form of leaves, which shows that the clone has successfully transitioned into the vegetative stage. If the clone still looks weak or the roots aren’t fully developed, give it more time to establish in the weed cloning kit.
Preparing the Soil or Medium for Transplanting
Once the clones are ready, preparing the soil or growth medium is the next important step. Choose a high-quality, well-draining soil mix or soilless medium, as these provide the right environment for young plants. Adding perlite to the mix improves drainage and aeration, which are key to preventing root rot. This method works especially well when using organic marijuana seeds. Lightly moisten the medium before transplanting to make it easier for the roots to spread into their new environment.
Dig a small hole in the medium, large enough to accommodate the root structure without bending or breaking it. Gently place the clone into the hole, filling it with soil or medium around the roots. Press lightly to secure the plant, being careful not to compact the medium too tightly, as this can restrict root growth.
Transitioning Clones from Kit to Grow Area Safely
Transitioning from a high-humidity environment in the cloning kit to a regular grow space can be a shock for young clones. This process, known as “hardening off,” helps them adapt to less humidity and greater airflow. Start by removing the humidity dome for a few hours each day, gradually increasing the time until they no longer need it. This step prepares the clones for the normal humidity levels in a grow room.
If transplanting outdoors, introduce the clones to sunlight gradually by placing them in indirect light for the first few days. This prevents sunburn and helps the plants acclimate to outdoor conditions. With indoor grows, you can place the clones directly under grow lights, but make sure they aren’t exposed to intense light immediately. Gradually increase the light intensity to encourage strong vegetative growth.
Enhancing Clone Health and Growth Post-Transplant
Nutrient Schedule for Transplanted Clones
Once your clones have settled into their new medium, they’ll need a structured nutrient schedule to support healthy growth. Start with a light feeding of nitrogen-rich nutrients to encourage leaf and stem development. Since young plants are sensitive to nutrient concentrations, begin with a solution at about half the recommended strength, gradually increasing as the clones adjust.
Around two weeks post-transplant, clones are typically ready for full-strength vegetative nutrients. Balanced macronutrients with a high nitrogen ratio support rapid vegetative growth, while calcium and magnesium prevent deficiencies often seen in fast-growing cannabis plants. Monitor for signs of nutrient burn or deficiencies, adjusting the feeding as needed.
Encouraging Strong Root Development in Vegetative Growth
A robust root system is essential for cannabis plants, providing the foundation they need to uptake water and nutrients efficiently. During the early vegetative stage, adding a root booster or supplement with beneficial microbes to your feeding schedule can support vigorous root expansion. These supplements foster a healthy microbial environment around the root zone, promoting faster, stronger root development.
Avoid excessive watering, as roots need oxygen to grow. Allow the top inch of soil to dry out between waterings, encouraging roots to expand downward in search of moisture. This practice helps plants establish a more resilient root system, essential for robust growth throughout the vegetative and flowering stages.

Advanced Cloning Techniques for Better Yields
Topping and Training Clones for Maximum Production
Once your clones have entered the vegetative stage and developed a few sets of leaves, topping and training techniques can help maximize their yield potential. Topping involves trimming the top of the main stem to encourage the plant to grow multiple main colas instead of a single one. This technique not only increases yield but also creates a bushier structure, ideal for maximizing space in indoor grows.
Low-Stress Training (LST) is another effective method. By gently bending branches and tying them down, you expose more of the plant to light, resulting in more bud sites. LST is especially beneficial for cloned plants, which respond well to early training and can develop multiple flowering sites, increasing the potential yield per plant.
Cloning from Clones: Creating a Perpetual Garden
One advanced benefit of using a weed cloning kit is the ability to create a perpetual garden by cloning clones. If you have a particularly strong or desirable plant, you can take cuttings from it and root them into new clones. With careful planning, you can establish a cycle where clones are continually taken from maturing plants, providing a continuous harvest.
Cloning from clones requires close attention to plant health, as genetic drift can sometimes occur over multiple generations. However, with high-quality genetics, like those found in Super Lemon Haze seeds, and proper care, cloning from clones can be a sustainable way to maintain a steady crop of cannabis plants without relying on new seeds each time.
Integrating Cloning into Different Grow Setups
Cloning works well in various grow setups, from soil-based systems to hydroponics. Each setup offers unique advantages, but hydroponic systems are particularly effective for clones because they deliver oxygen and nutrients directly to the roots, accelerating growth. If you’re growing clones in hydroponics, use a well-aerated medium like Rockwool or coco coir to support root health.
Soil and soilless mediums provide stability and natural nutrient sources, making them ideal for beginners or organic growers. Whether you choose hydroponics or soil, a quality cloning kit can integrate smoothly into either setup, allowing for successful propagation and growth in diverse environments.

Troubleshooting Cloning Issues
Root Rot and Overwatering Prevention
One of the most common issues in cloning is root rot, often caused by overwatering or poor drainage. Root rot results from waterlogged conditions that prevent roots from accessing oxygen, leading to decay. To prevent this, use a well-aerated medium in your cloning kit, and only water when the medium feels slightly dry to the touch.
If root rot develops, try cutting away any brown or mushy parts of the roots and replanting the clone in fresh, clean medium. A root enhancer with beneficial microbes can help the plant recover. Additionally, ensure that the growing environment has good airflow to prevent humidity from becoming excessively high, as this can also contribute to fungal growth.
Addressing Leaf Yellowing and Nutrient Deficiencies
Yellowing leaves in clones can be a sign of nutrient deficiencies, most commonly nitrogen, which is essential during vegetative growth. If you notice yellowing, particularly in older leaves, introduce a light nitrogen feed to support leaf health. However, be cautious with nutrients during early rooting, as young clones are sensitive to strong feeds.
Magnesium and calcium deficiencies are also common in clones, especially in soilless or hydroponic systems. Adding a calcium-magnesium supplement can help resolve issues with leaf yellowing, spotting, or curling. Monitor the leaves regularly, as quick adjustments can often save a clone from further stress or damage.
Preventing Pest Issues in Clones
Clones are especially vulnerable to pests like spider mites and aphids, which thrive in high-humidity environments. To keep pests at bay, regularly inspect the leaves and stems for signs of insects or eggs. Using sterilized equipment and maintaining clean growing conditions can greatly reduce the risk of infestation.
If pests appear, organic pest control methods like neem oil or insecticidal soap can help remove them without harming the clone. However, avoid using harsh chemicals, as these can damage young plants. For severe infestations, consider isolating the affected clone to prevent pests from spreading to other plants.