Clone Growth Week by Week Guide
Clone growth week by week can be a game-changer for anyone interested in growing robust cannabis plants from cuttings. The process of nurturing cannabis clones week after week is much more than simply planting and waiting; it requires knowing the specific needs of each stage of development, from the very first roots to full vegetative growth. For anyone looking to improve their results, focusing on your clone’s health at each stage is vital.
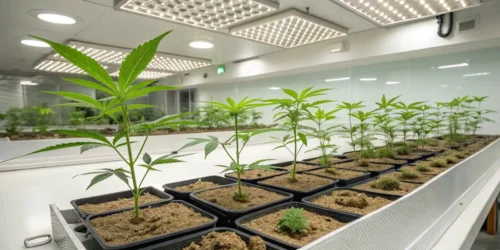
Week 1 – Root Development and Early Growth
During the first week, the clone primarily focuses on root development. At this stage, maintaining adequate humidity is essential to allow the root system to establish itself properly. Since the clones rely heavily on environmental moisture due to their underdeveloped roots, keeping the humidity high (around 80-90%) is crucial for survival.
Week 2 – Strengthening Roots and Beginning Leaf Formation
By the second week, the roots should start growing more vigorously, allowing the clone to absorb more water and nutrients. At this point, you will also see the beginning of new leaf formation. It’s possible to slightly reduce the humidity (around 70-80%) and increase the light exposure to encourage healthy leaf growth.
Week 3 – Transition to Vegetative Growth
During the third week, the clone’s roots will be stronger, and you should see more robust top growth. This is a critical phase as the plant transitions into the vegetative stage. You can begin introducing mild nutrients, focusing on those rich in nitrogen, to promote strong leaf and stem development.
Week 4 – Accelerating Vegetative Growth
By the fourth week, well-rooted clones will be in full vegetative growth. You will notice accelerated leaf and branch growth, indicating the clone is ready for more intense light and nutrients. At this stage, humidity can be reduced to 60-70%, and nitrogen-rich fertilizers will keep the plant growing fast and healthy.
Week 5 – Continued Vegetative Growth and Structural Development
In week five, the clones should be in full vegetative mode, with structural development as a priority. The focus is on building strong branches to support future flower development. Maintain a steady nutrient regimen with plenty of nitrogen, and ensure the clones are receiving at least 18 hours of light daily for optimal growth.
Week 6 – Pre-Flowering Preparation
The sixth week marks a period of transition as the plant starts preparing for flowering. During this phase, monitor the plant structure closely and consider light pruning or using techniques like LST (Low-Stress Training) to manage growth and ensure better light penetration to all branches. Humidity should be gradually reduced to around 55-60%.
Week 7 – Transition to Flowering
By the seventh week, the clones should be ready to transition to the flowering stage. Switch the light cycle to 12 hours of light and 12 hours of darkness, mimicking the natural change in seasons, to initiate flowering. It’s also time to switch to nutrients that encourage flower development, increasing phosphorus and potassium while reducing nitrogen.
Week 8 – Early Flower Development
Starting in the eighth week, the plant will show clear signs of flowering. The clones will begin forming pistils and small buds. Increase phosphorus in the nutrient feed to promote healthy flower development. Adjust the humidity to lower levels, ideally between 50-55%, to prevent mold and other humidity-related issues.
Week 9 – Bud Formation and Resin Production
During the ninth week, the buds will begin to gain mass, and the resin glands will start producing visible trichomes, responsible for the aroma and cannabinoid content. It’s critical to maintain a stable environment, with temperatures between 68-75°F (20-24°C) and humidity around 45-50%. Continue feeding balanced nutrients to support bud growth.
Week 10 – Bud Swelling and Trichome Development
By the tenth week, the buds should become denser, and trichome production will increase. The aroma will intensify, and the flowers will continue to swell. At this stage, reduce humidity to 40-45% to ensure no mold issues, and make sure there is adequate airflow in the grow space.
Week 11 – Final Flowering Stage
In week eleven, the plant will be in its final flowering phase, with buds reaching their maximum size and producing large amounts of resin. This is the time to begin closely examining trichomes under a magnifying lens. Clear trichomes indicate the plant is not yet ready, while amber-colored trichomes signify it’s time for harvest.
Week 12 – Harvest Time
By week twelve, most cannabis clones will be ready for harvest. It is important to flush the plants with pure water for at least a week before harvesting to remove any excess nutrients and enhance the final flavor. The buds should be dense, sticky, and covered with trichomes, ready for drying and curing.

Promos & Deals
Optimizing Your Clone’s Growth Each Week
Optimizing clone growth week by week involves knowing the specific needs of cannabis plants at every stage. Each week brings new challenges and opportunities, and the right adjustments can make all the difference between a healthy, thriving clone and one that struggles.
Ideal Lighting Conditions for Clones (Week 1 to Week 4)
Lighting plays a critical role in the success of your clones. During the first week, low-intensity light is essential for root development, as harsh lighting can overwhelm clones before they are ready. Consider using CFLs or LED lights with a low output during week one.
By week two, you can begin to gradually increase the light intensity. A common mistake is rushing this process, but remember, too much light too soon can stunt clone growth. Keep the lights on for 18 hours per day, allowing your clones ample time to absorb energy without being exposed to excessive heat or stress.
By week four, your plants should be under full-strength lighting, but always monitor how your clones respond. Too much light can bleach the leaves, while too little light will result in slower growth.
Adjusting Nutrients for Each Growth Stage
Nutrients are essential to keeping your clones healthy and growing strong week after week. However, it’s important to match the nutrient regimen to the clone’s current needs. In the first week, focus primarily on rooting hormones and avoid heavy nutrients.
During week two, you can begin introducing a mild nutrient mix to strengthen the roots and support early leaf formation. A balanced N-P-K ratio with a slight emphasis on phosphorus for root growth is a good choice.
By week three, as your clones transition into vegetative growth, you should increase the nitrogen content to encourage leafy growth. Finally, by week four, your plants should be able to handle a full-strength nutrient mix tailored to vegetative cannabis plants. This approach ensures optimal clone growth week by week, supporting vigorous growth and preparing your plants for the flowering stage.
Temperature and Humidity Control Throughout Cloning
Maintaining the right temperature and humidity levels is key to clone growth. In the first week, higher humidity levels (around 70-80%) are essential for clones, as they don’t yet have a well-developed root system to absorb water. Temperatures should be kept between 72-78°F to encourage root growth without stressing the clones.
As your clones develop in week two, gradually lower the humidity to around 60-70% to prevent mold and mildew, while keeping the temperature in the same range. This slight reduction in humidity helps to toughen up the clones as they adjust to their environment.
By week three and four, when your clones are transitioning into vegetative growth, a lower humidity of around 50-60% is more appropriate, along with a temperature range of 70-75°F. This creates the perfect environment for your cannabis plants to grow strong and healthy as they continue to develop.
Issues During Clone Growth
While the process of clone growth week by week can be highly rewarding, it’s important to be aware of the potential issues that can arise. Every stage of growth comes with its own challenges, and recognizing these early can help prevent setbacks that may delay or even halt the development of your clones.
Recognizing Rooting Problems in Week 1
One of the biggest concerns in the first week of clone growth is rooting failure. Without proper root development, your clones won’t be able to absorb water and nutrients, leaving them stunted and potentially leading to death.
A common sign of rooting problems is wilting, where the clone appears to be sagging or losing its rigidity. This can happen if the rooting medium is too dry or if the environment isn’t humid enough. Ensuring consistent moisture and high humidity (70-80%) will help prevent this.
If your clones are showing signs of yellowing, this could also indicate that they aren’t forming roots properly. Yellowing in the early stages can be a sign of nutrient deficiency, but it’s more often a signal that the clone is struggling to take up water. Using a rooting hormone and keeping the medium moist, but not soaked, can encourage faster root formation. This attention to detail in the first week of clone growth is crucial for long-term success.
Monitoring Leaf Development and Spotting Deficiencies
As you progress into week two and beyond, monitoring leaf development becomes a key aspect of successful clone growth. If your clones aren’t producing new leaves or if the leaves that do form are discolored, this could be a sign of nutrient deficiencies or environmental stress.
Cannabis clones that show stunted leaf development during the second and third weeks may not be receiving enough light or nutrients. Make sure to gradually increase the light intensity and nutrient levels as the clones grow stronger. Yellowing leaves during this stage often indicate a lack of nitrogen, which is crucial for leafy growth. Adjusting your nutrient mix to provide more nitrogen can help address this.
Keep a close eye on the new growth. Healthy leaves should be bright green and firm to the touch. Any signs of curling, discoloration, or spotting can indicate a problem, and addressing these issues early will ensure smooth clone growth week by week.

When to Prune or Top Your Clones
Pruning and topping your clones are important techniques for shaping the plant and promoting better growth. However, the timing of these techniques is critical for ensuring your clones remain healthy and strong.
Generally, you should wait until your clones have fully transitioned into vegetative growth, which usually happens around week three or four. At this point, the plants have established a solid root system and enough leaf development to support further growth.
Topping your plants involves cutting off the main stem just above a node, which encourages the plant to grow two new main stems instead of one. This helps to create a bushier plant, which is ideal for maximizing yields. Pruning involves removing any lower leaves or branches that are underdeveloped, allowing the plant to focus its energy on the healthier, top parts.
Timing is everything. Pruning or topping too early, especially before the roots are fully established, can shock the plant and stunt its growth. Waiting until week three or four ensures that your plants have the strength to recover quickly from the stress and continue growing vigorously.
Managing Watering for Clones Week by Week
Week 1 – Minimal Watering to Prevent Over-Saturation
During the first week, the clone’s root system is still developing and very delicate. Watering should be minimal to avoid over-saturating the growing medium. Misting is the most effective method to keep the surface moist without overwhelming the roots. It’s crucial to ensure that the medium remains slightly damp but never too wet, as excess water can suffocate the roots and lead to root rot. If using a dome to maintain humidity, this will help reduce the need for frequent watering.
Week 2 – Light Watering as Roots Establish
By the second week, the roots will have started to grow deeper, but they are still fragile. At this stage, you can introduce light watering, but be cautious not to overdo it. Using a spray bottle to lightly mist the growing medium will provide enough moisture to encourage root growth without waterlogging the medium. Monitor the top layer of soil or substrate, if it feels dry to the touch, it’s time to water lightly again.
Week 3 – Gradually Increasing Watering Frequency
As the clone enters week 3, its root system should be more developed, allowing you to increase the frequency of watering. However, the volume of water should still be relatively small. Water around the base of the stem carefully, ensuring that the water reaches the deeper roots without flooding the young plant. Depending on the medium and environmental conditions, watering every 2-3 days may be sufficient. Ensure that the medium is evenly moist but not saturated.
Week 4 – Transition to Regular Watering Schedule
By week 4, the clone should be in the vegetative stage, with an increasingly robust root system capable of handling more water. At this point, you can transition to a regular watering schedule. Water the plants more thoroughly but ensure that excess water drains out of the bottom of the container to avoid water pooling, which can lead to root diseases. Check the weight of the pot before and after watering to get a sense of when it’s time to water again.
Week 5 – Adjusting Watering for Vegetative Growth
In the fifth week, the clone is now actively growing, and its water needs will increase as the plant develops more leaves and branches. Water more generously, ensuring that the water reaches all parts of the root system. If growing in soil, aim for watering every 2-3 days, depending on how quickly the soil dries out. In coco coir or soilless mixes, you might need to water more frequently as these mediums dry out faster. Always allow some drying between waterings to encourage strong root growth.
Week 6 – Deep Watering to Support Strong Growth
At this stage, the plant is fully in its vegetative phase, and deep watering becomes essential to ensure the roots can access moisture and nutrients throughout the pot. Water deeply until you see runoff from the bottom of the pot. This ensures the entire root system is hydrated. Watering deeply but less frequently will encourage the roots to grow deeper, resulting in a stronger, healthier plant.
Monitor for signs of underwatering, such as drooping leaves, and overwatering, such as yellowing lower leaves or consistently wet soil. Adjust watering practices accordingly to maintain healthy growth.
Week 7 – Pre-Flowering Watering Adjustments
By week 7, the plant will start transitioning to the pre-flowering stage. At this point, it’s important to continue deep watering, but you should also begin reducing the amount of nitrogen in the nutrient solution and increasing phosphorus and potassium to promote flowering.
As the plant prepares to bloom, it will need a consistent supply of water, but it’s important to let the top inch of soil dry out between waterings. This drying cycle encourages root expansion and prepares the plant for the heavier demands of flowering.
Week 8 – Watering During Early Flowering
During week 8, the plant has fully transitioned into the flowering phase. Watering should remain consistent, but be mindful of the plant’s increased nutrient demands. The plant will consume more water and nutrients during this period, so you may need to water more frequently. However, avoid overwatering as excess moisture can lead to mold or bud rot, especially with the increased humidity levels in dense buds.
Monitor the leaves for any signs of stress. If the leaves are drooping and feel limp, it could indicate underwatering, while yellowing leaves could indicate overwatering.
Week 9 – Balancing Water and Nutrients
As the buds continue to swell during week 9, water consumption increases. It’s crucial to maintain a balance between watering and feeding the plants with blooming nutrients. Continue deep watering to ensure the plant can access all the nutrients it needs.
Watering should be done in the morning (if growing outdoors) or just after the lights come on (for indoor grows) to avoid humidity buildup overnight. Keep humidity levels in check, as excess moisture can lead to issues like bud rot.
Week 10 – Reducing Water Before Final Bud Swelling
By week 10, the buds are nearing their final size. You can start to reduce the amount of water slightly, encouraging the plant to focus on resin production. While the plant still needs adequate hydration, overwatering during this stage can lead to too much moisture in the buds, increasing the risk of mold. Keep humidity levels low, especially in the final weeks of flowering, ideally around 40-45%.
This is also the time to monitor trichome development to determine the harvest window, adjusting watering accordingly.
Week 11 – Preparing for Flushing
In week 11, most growers begin the flushing process to remove any remaining nutrients from the growing medium. Flushing involves watering the plants with plain water (pH-balanced) to help clear the nutrient buildup and improve the flavor and quality of the final product.
During flushing, avoid overwatering but ensure enough water is used to adequately cleanse the medium. This helps the plant focus on using up the nutrients stored in its tissues during the final stages of flower ripening.
Week 12 – Final Week Before Harvest
In the final week, watering should be minimal. The goal is to allow the plant to fully mature and prepare for harvest. Most growers continue flushing during this week, but the frequency of watering can be reduced as the plant focuses on ripening its buds. You want the growing medium to be dry but not overly parched at harvest time.
By the end of week 12, the trichomes should have developed their desired color (cloudy or amber), indicating that the plant is ready for harvest. After this, you can stop watering completely for the last few days to promote better drying and curing of the buds.